Products
Whenever you have a bill of materials (BOM), you have a Product and every product has an in-house Part associated with it. While the Product helps on managing the BOM, its revisions and its production lifecycle, the Part itself helps on keeping track of its inventory.
You can have an in-house Part that doesn't have a Product, but not the other way around. An example of this would be PCBs, the physical boards themselves: you want to keep track of how many PCBs you have available to be used in production but the PCB itself is not the (final) product itself. Another example could be mechanical parts that are machined or 3D printed in-house and that don't need a BOM by themselves.
Projects will be renamed to products. This change is already present in the beta releases.
To change the name of a product, you change the Part Number
of the in-house
part it is associated with.
Revisions
A product can have multiple revisions, each including a single BOM. Each revision can have its own documents and notes.
Production plans and builds can be created for each BOM and help you plan and track production, respectively. More on this below.
Bill of Materials (BOMs)
A bill of materials describes all the parts and quantities needed to produce one unit of your product.
Learn more about it here.
Designators and quantities
Designators are the reference designators that unambiguously identify the placement of a part (or parts) in the product (e.g. C1, C2
or C1-2
), which in regards to electronics products would be the printed circuit board (PCB). When creating a BOM line, Designators
are optional. However, if defined, the Qty
is derived from it, regardless of what you might have manually entered or imported in the Qty
field.
A few examples:
Designators | Qty |
---|---|
C1, C2, C4 | 3 |
R2-9 | 8 |
When Designators
are omitted, the Qty
must be defined.
Assigning parts
Assigning a part to a BOM line can be done when manually adding or editing the BOM line or when importing the BOM through a CSV file.
To assign parts in a BOM, those parts must already exist in the workspace. This means that, if they don't, you'll have to import them first and in this case, you might use your BOM's CSV file to import the parts themselves.
The reason for this is that when importing parts, the info about the part should be as complete as possible (at least a Part Number
and Manufacturer
must be provided), while when identifying parts to be assigned in a BOM you might simply use an Internal PN
for example or any other part's field of your choice. This can be configured through the BOM preferences dialog.
BOM preferences
When importing the BOM you can pass information about the part you want to assign to each row. The fields that are matched against existing parts are the ones listed in the BOM preferences dialog, and in that order:
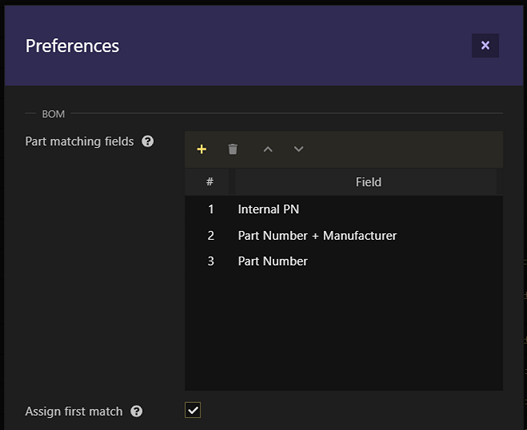
By default, the app tries to match parts by Internal PN
, Part Number
and Manufacturer
, and simply by Part Number
. If it can't find any parts that match the Internal PN
, or if this field is not mapped, it then tries to match parts by both Part Number
and Manufacturer
and at last, if still no part has been matched, it tries to match them by the Part Number
.
You can however define any other fields, even custom ones, and its order.
When defined, the Value
and Package
fields are always considered when matching parts to be assigned.
If the Assign first match
option is checked, the app will assign the first part it finds that matches your criteria. Otherwise, no part is assigned but the app will still present you with all parts it found so you can manually pick one among them.
Part matching data
Even before assigning parts, you can manually define part matching data (PMD) for each row in a BOM. This data should provide enough information of what part should be picked for a row, other that the Value
and Package
fields, if defined. The app will then use this information and present you with suggestions of parts that can be assigned to each row.
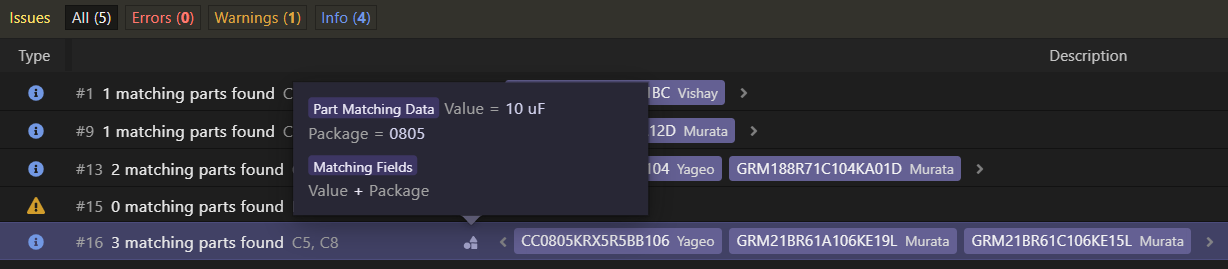
However, the most common scenario to use PMD is probably when importing a BOM. In this case, the PMD is automatically set, based on the fields mapped when importing the CSV file. This way, even if no parts are matched (because no such parts exist on your workspace yet), you still have an indication of the data it should match the parts to.
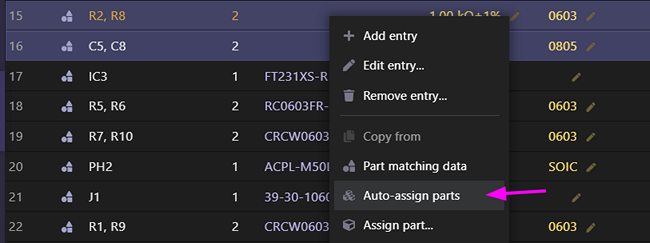
Auto-assigning parts
Parts can be auto-assigned upon importing a BOM, as explained above, or at anytime through the Auto-assign parts...
action menu, as long as there's rows in the BOM with parts to be assigned:
Sub-assemblies
A sub-assembly is essentially an in-house part being used in the BOM of another in-house part.
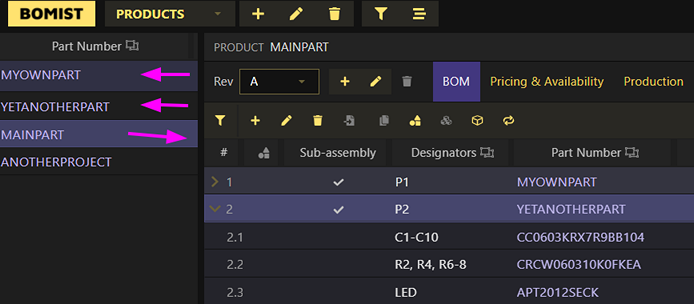
On the top-right corner of the BOM you can set the BOM view to either Single-Level
or Multi-Level
. Multi-level
will allow you to expand sub-assemblies, so you can see its BOMs as in the picture above.
Pricing & availability
The pricing & availability table can be useful to quickly estimate the cost of a BOM or the production of a given batch quantity. You can set the purchasing criteria to if needed
or all
and the app will quote the BOM considering inventory that you have on-hand or not, respectively. It also tells you which parts you are missing.
For the app to be able to provide you with an estimate cost you need to make sure all the lines also have an estimated cost. This means either the parts used in it have a unit cost defined or, the ones that don't and need to be purchased, have a quote selected. Quotes can be auto-assigned, the same way it's done in purchase lists.
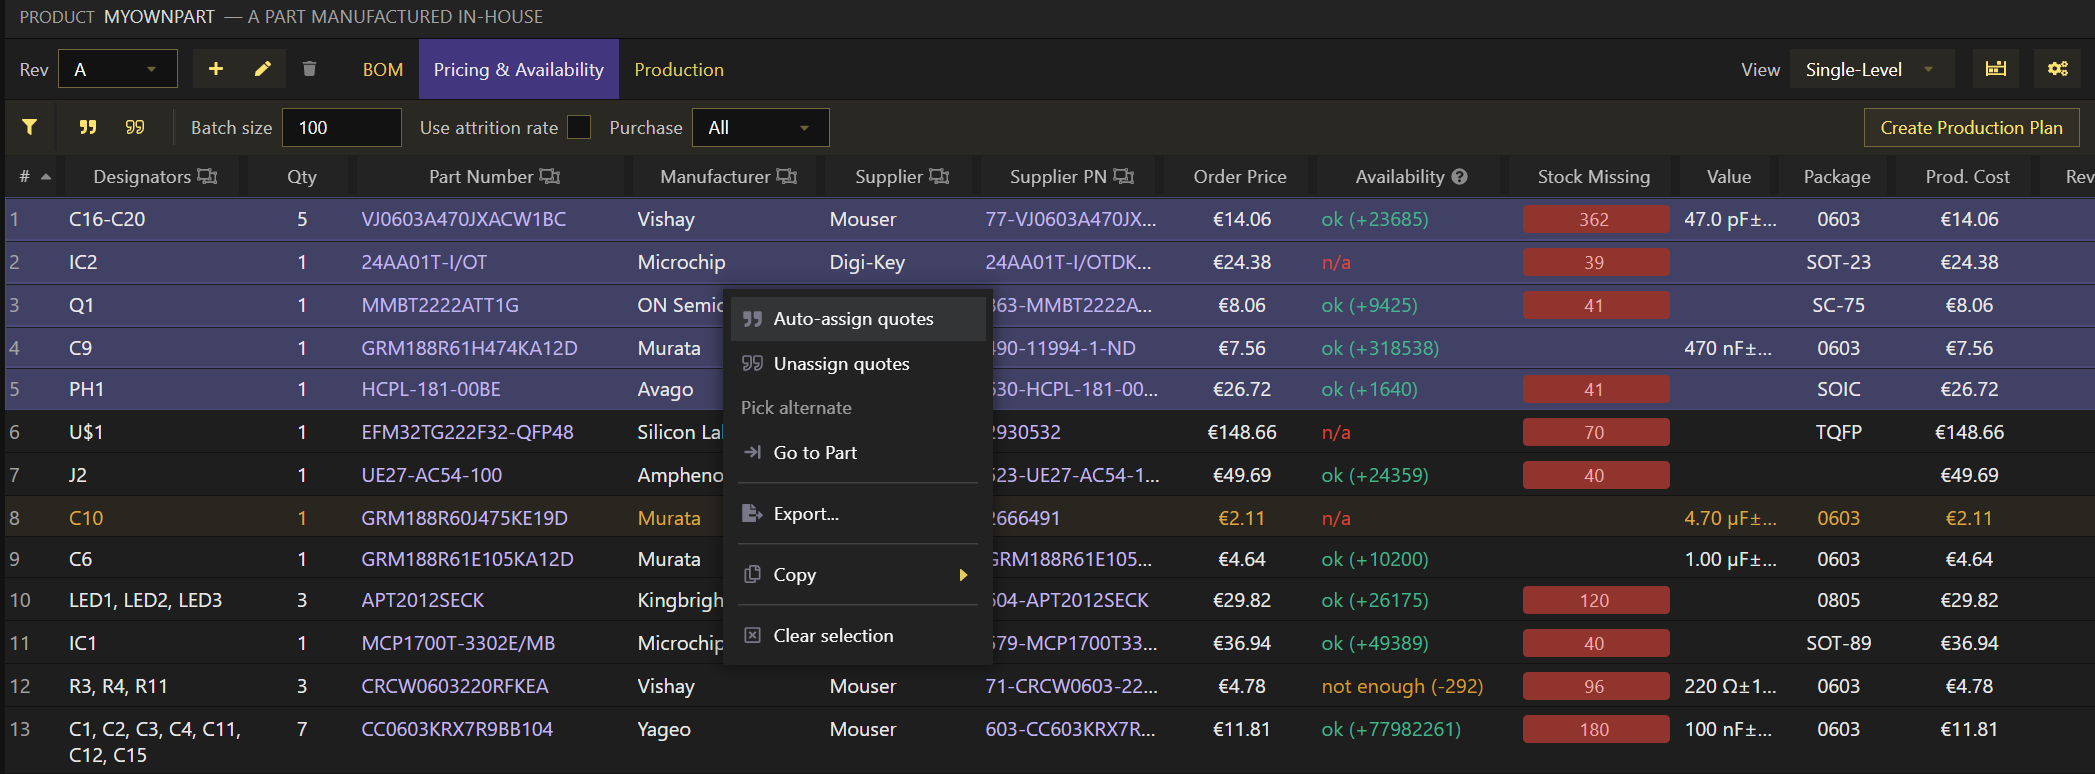
When quotes have been picked, the Availability
column tells you how much stock is available on the selected supplier.
From this table you can also proceed to create a production plan or, if your subscription doesn't support it, to create a purchase list for the missing quantities.
When checking for missing inventory in the Pricing & Availability
table, the app only looks at the required quantity and currently available inventory. This means that missing inventory might have already been procured (i.e, it's planned, on-order or in-production) but it's just not available yet. For this reason, the stock balance should give you a better picture of whether you are currently overstocking or understocking. In other words, stock balance should tell you if you need to procure more of a given part, or not.
For improved planning and automated procurement, you should always use production plans whenever planning and scheduling production.
Ownership and inventory restrictions
A product might have an owner. An owner is a Contact. In this case, the owner might as well represent a customer, depending on your use case. The main goal here is to be able to enforce that only inventory that belongs to this product or owner can be used during production.
For products that have an owner, during production, and by default, inventory can only be picked from storage locations that belong to that same owner. This can be changed through the inventory restrictions dialog though, by enabling other storage locations, possibly owned by others, to be used as well.
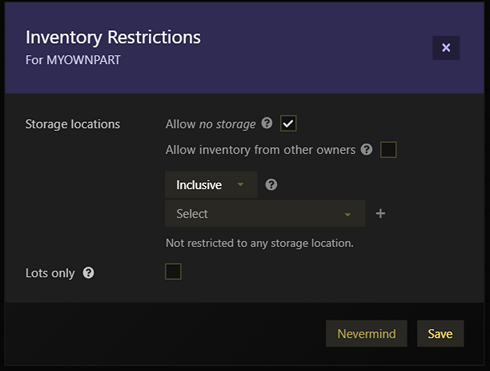
Even if a product doesn't have an owner, you can still use the inventory restrictions dialog to limit the inventory that can be used in production, or rather from where it can be sourced.
These restrictions are applied per product (and all its revisions).
Production
The production workflow should look something like this:
Production plans are used to plan and schedule your production while production builds are used to track it. Perhaps a little bit similar to purchase lists, which also allow you to list (or plan) the parts you need to buy and from which suppliers, while purchase orders track the orders themselves on a given supplier.
From a single BOM you can create several production plans which later on might be converted into a single production build. Production builds can also be created straight from a BOM, but you lose the planning and scheduling capability. More on this below.
Production plans
Production plans are available only on professional plans. In other plans, you can still create production builds.
Each production plan indicates a need for a given quantity to be produced and when that quantity should be ready. It can also tell why that quantity needs to be produced.
Production plans allow you to check if you have enough inventory to build multiple products, which might have parts in common, at a given time. A single production build can be created from multiple production plans for the same part.
When Use Alternates
is checked, the app checks for inventory on each part's alternates as well, so if the part is out of stock but one or more of its alternates has stock, the inventory from its alternates is considered instead. Note that this is only used to check for parts and quantities that need to be procured but it won't replace the part itself being used in the created production build(s). Eventually, during production, you'll have to replace that by another one that has stock or use a generic part so you can source inventory from multiple parts.
Partial builds
The app can check if you have enough inventory to create a partial build and, in that case, it would create two builds instead of one for the total quantity:
- One to track the quantity that can be already produced
- Another one to track the quantity that is waiting for missing inventory
In the picture above, we can see that even though we want to produce 120 units (Batch Size = 120
), only 25 units can be built (Max. Batch Size
) with the currently available inventory (or inventory that's not available yet but it is incoming and not allocated for anything else). We can also see exactly which parts are responsible for the partial builds, how much quantity is missing for each part and which parts we have the full quantity to produce the whole batch.
If you would still prefer to create a single production build you can check the No partials
option. In the example about, a single production build with batch size of 120 would be created.
Procurement
Production plans also take care of procurement, so purchase lists and possibly other production plans (in case of sub-assemblies) are automatically created by the app whenever creating production builds from plans. Just before creating the builds, the app confirms you the builds that are about to be created as well as all the parts that need to be procured and, as such, will be added either into a purchase list or for which production plans will be created for.
Production builds
Production builds track the production and expect inventory to be available so the production can be fully completed. Production is split into 4 different stages:
Once the production build is created, it creates in-production inventory for the in-house part it refers to, and allocated inventory for all the parts used in its BOM. We say the production build has been allocated.
The app will then tell you if you are missing some parts and in which quantity:
At this point you'll want to make sure you have all the inventory needed to fulfill the production. If generic parts have been listed in the BOM, you'll have to pick actual inventory from its alternate parts and possibly from more than one part as inventory from alternates can be interchangeably used.
Similar to the Pricing & Availability
table, when checking for missing inventory production builds only look at the required quantity and currently available inventory. This means that missing inventory might have already been procured (i.e, it's planned, on-order or in-production) but it's just not available yet. For this reason, the stock balance should give you a better picture of whether you are currently overstocking or understocking. In other words, stock balance should tell you if you need to procure more of a given part, or not.
The build will have to be cancelled or removed and a new one created with the desired batch size but, in case it has been originally created through production plans, this is actually a good thing. Learn more about this below.
Reserving inventory
Also commonly referred to as kitting inventory, this consists of picking actual inventory to be used during production. This reserves inventory, ensuring that it cannot be used for anything else. Reserving inventory creates reserved inventory and moves the production build into the fulfillment stage. Inventory for the same part can be picked (or kitted) from different storage locations (i.e. sources).
Assembling items
Marking items as assembled will effectively subtract inventory from your workspace and moves the production build into the in-progress stage.
You might skip the fulfillment stage, described above, if that would make sense for your use case and instead proceed straight into marking items as assembled. You still have to pick actual inventory as if you'd be reserving it though.
Items might be reserved and/or marked as assembled at different times. For example, through-hole components could be reserved/marked as assembled after all the surface mount components have been assembled.
Items have to be reserved or marked as assembled in full. If you want to reserve inventory or mark as assembled only a part of the required quantity, you can (right-click and) Split item...
so you take a given quantity from the original item and put it into a new line.
If instead of an item you want to adjust the total batch size of the build, you'll have to cancel or remove the build and create a new one. Previously reserved inventory, if any, gets unreserved.
Finishing the build
Finishing a production build increases the available inventory for the in-house part it refers to. At the same time, the unit cost can be updated (value is automatically pre-filled according to the unit costs of all parts used during assembly) and a lot created so later on you could trace the inventory back to the production build where it was created.
Finishing a production build doesn't remove inventory from the parts listed in it. The items in the production build must be individually marked as assembled for the inventory to be subtracted from them.
Dealing with attrition
When creating production builds, either through production plans or straight from a BOM, you can tell the app whether to use attrition rate or not. This will add an extra quantity to the required quantity for each part that as an attrition rate defined and which accounts for inventory losses.
As a result, at the end of production you might end up with some leftover parts that you might want to add back in stock. In this case, we suggest creating a spreadsheets file to list all the parts and quantities that you want to add back in stock and then import it, perhaps adding a comment briefly explaining the reason for this stock adjustment.
Cancelling a production build
Production builds can be canceled. The difference to removing the production build altogether is that:
- The production build will still be listed on the app, just marked as cancelled
- If the production build was created from production plans, the production plans are recreated
This means that, in case the build was created from production plans, cancelling it is the best way to change its batch size and still keep the information on why you'll be building more or less. Once cancelled, you might change the production plans' quantities that originated it or simply pick some other production plans that would again result in a single build.
As an example, let's say you have a production build already allocated but you got another production request last minute and you still want to accommodate that extra quantity, described through a new production plan, in the same production build. You'd cancel the build and create a new one, now using the same plans that originated it before, plus the new (last minute) production plan.
Cancelling a production build will also cancel its procurement.