Barcodes
Barcodes can be used to quickly look up things in the app, create new parts, add or adjust stock, move inventory or storage locations.
Generating barcode labels
The app comes with 3 barcode label templates.
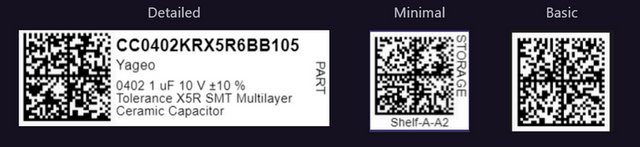
You can pick the template that best suits your needs whenever exporting barcode labels and globally under the Settings - Barcodes dialog.
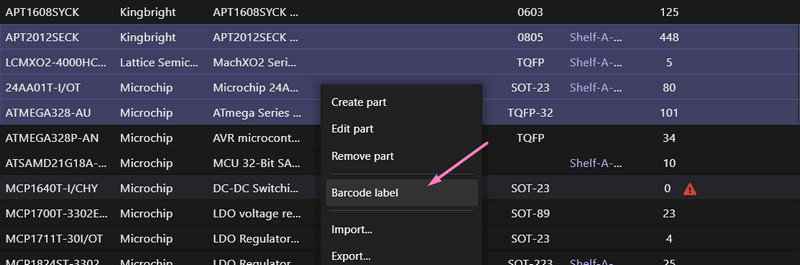
Barcode labels are available for parts, inventory, storage locations and lots. Multiple barcode labels can be exported or printed at a time by selecting the items they refer to on tables.
Supported barcodes
Barcodes supported by the app are:
- The ones generated / printed through the app
- Any textual barcode representing something in the app that can be searched for (e.g. a
Part NumberorInternal PN) - Vendor-barcodes containing ANSI MH10.8.2 data and using the ISO/IEC 15434:2006 format (e.g. Mouser, Digi-Key)
- Some other vendor-specific barcodes (e.g. TME, LCSC)
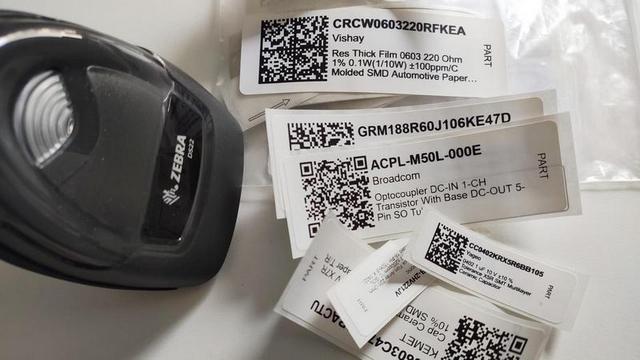
The app has been tested with a Zebra DS2278 barcode scanner and another white-label cheap unit. Both 2D scanners should work out of the box for 1) and 2) described above. However, reading vendor-barcodes requires some additional configuration which cheaper units might not support. You can learn more on how to configure a Zebra scanner bellow.
Reading vendor-barcodes
In order for the app to be able to read vendor-barcodes, make sure your barcode scanner:
- Uses your current Keyboard Layout
Most barcode scanners come defined with a North American layout, so they will output characters as if a US Keyboard is being used on your computer. If you don't use an US Keyboard, change the barcode scanning settings to use the one being used on your computer.
- Can replace (invisible) characters
As the ISO/IEC 15434:2006 format includes non-printable characters,
the ASCII control characters RS, GS and EOT must be replaced by the text <RS>, <GS> and <EOT>, accordingly. Curly brackets, instead of arrow brackets, can also be used (e.g. {GS} instead of <GS>).
Additionally, through Settings - Barcodes you can also set the text the group separator (GS) should be replaced with. This might be useful for barcode readers that support replacing non-printable characters by a single character only. If you make use of this setting, make sure you pick a character that doesn't show up on part numbers.
Once this is done, open a text editor and scan a ISO/IEC 15434:2006 barcode. You should get something like the text below (notice the initial characters and the group separators):
[)>06{GS}K11477880{GS}14K016{GS}1PCRCW0603220RFKEA{GS}Q30{GS}11]
Configuring a Zebra DS2278
Zebra DS2278 barcode scanners, using the US keyboard layout, can be configured by simply scanning the barcode in this configuration file.
In case you need other settings (e.g. other keyboard layout, hands-free mode, etc) you can still use this configuration as a starting point. First, scan the barcode included in the configuration file, then you use the 123Scan app (by Zebra) to clone, edit and re-upload a new configuration into your barcode scanner. Another way to set additional configurations would be to scan configuration barcodes the barcode scanner's user manual often provides.
Reading text barcodes (one-shot mode)
By text barcodes we mean any barcode which text represents something that can be searched for in the app (e.g. a Part Number or Internal PN) but that's not a vendor-barcode or a barcode generated by the app.
In order to scan these barcodes you need to (temporarily) enable the one-shot barcode scanning mode. This will prevent any characters read from the scanner or your keyboard to be interpreted as something other than a barcode, potentially triggering any other action or shortcut in the app.
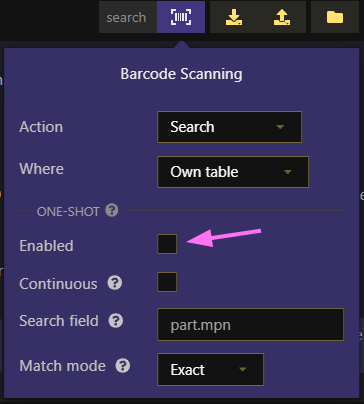
In case you want to scan multiple text barcodes in this way, you can also enable the continuous mode.
Scanning modes
Regardless of the barcode format (as described above), the results of scanning a barcode in the app depends on the currently selected scanning mode.
Search
This mode is meant to look up things in the app. You can search for those things in their own table or in the currently visible tables.
As an example, if own table is selected, when scanning a part the app will highlight that part in the Parts table (i.e. in the Parts tab). However, if you are in the Purchasing tab and you selected current tables, the app will highlight that part in the currently visible tables, which in this case would be a purchase list or purchase order.
You can also configure the app to select a single item or to keep selecting multiple items as you keep on scanning barcodes.
Add inventory
This mode is meant to be used strictly when scanning Part barcodes. Once scanned, the app will either present you with a dialog to add inventory to that (existing) part, or show you the Part dialog so you can create a new one if it doesn't exist yet.
When using this mode with vendor-barcodes, the QR code normally contains information about the part as well as the quantity in the bag so both fields are pre-filled in on the dialog being shown.
Actions
This is not a mode by itself, but if what you want is to complete an action (e.g. add stock) through a sequence of scans and without keyboard intervention, barcode actions is what you are after (described next).
Barcode actions
Tasks such as adding, removing or moving inventory between locations can be accomplished through a sequence of barcode scans and without the intervention of a keyboard or mouse. We call it barcode actions. A barcode action is initiated by scanning one of the barcodes available on the document below:
No extra configuration is needed as the app will automatically identify and parse the data encoded in these barcodes.
The app will then present you with the fields that must be scanned next in order to fulfill that specific action. The document above should be printed so you can use it while moving around your office or warehouse with your barcode scanner on hand.
Codes
Each barcode "label" on the document above (it's not really a label but a representation of it) also includes the text encoded in its barcode. You can create your own barcode labels, if needed, as long as you use these same action codes. For example, you'd use $Bacta_addinv to start an Add Stock action or $Bactqty_inc100 to increment a Quantity field by 100. Custom quantities can be defined as long as they are preceded by $Bactqty_<op> where the <op> should be replaced by the corresponding operation (inc to increment; dec to decrement; all to get all available quantity, if applicable; and zer to set the quantity to zero).
You can even use the API to generate or print your own labels (just as the ones generated by the app) that make use of these barcode action codes. An example of that is here. Documentation on how to export labels through the API can be found here.
Creating your own barcodes
The best way to create your own barcodes is by implementing a script that handles that task and by using it in the PDF print command as explained below. This way the script receives the data the barcode refers to, through the $data or $doc wildcards, and generates a custom barcode label, not having to use any of the templates that come with the app.
In order for the barcode to be recognized by the app, so the one-shot mode doesn't have to be enabled, the text encoded in the barcode must follow this format:
$Bsid<base-58-encoded-sid>
The sid stands for short id which is included either in $doc and $data. Please note that, in the same way data in $data and $doc is base-58 encoded, the sid must also be encoded in base-58 format when using it in the barcode itself.
An example:
# get the part's sid from $data or $doc (e.g. pa_Ngar7E4ejM29AgfaBwqDSF)
# encode sid in base58 format (e.g. nDjQzmMXjundNh8Szgt7JE151mRHLFrf3K)
# generate a barcode with the following text:

$BsidnDjQzmMXjundNh8Szgt7JE151mRHLFrf3K
You can also generate barcodes with custom data but using the templates provided by the app through the /barcodes/export endpoint of the API.
Configuring label printers
The app has been tested with a Brother QL-810Wc printer, but other models should work as well. Results will highly depend on the drivers support for your operating system though (more on this bellow).
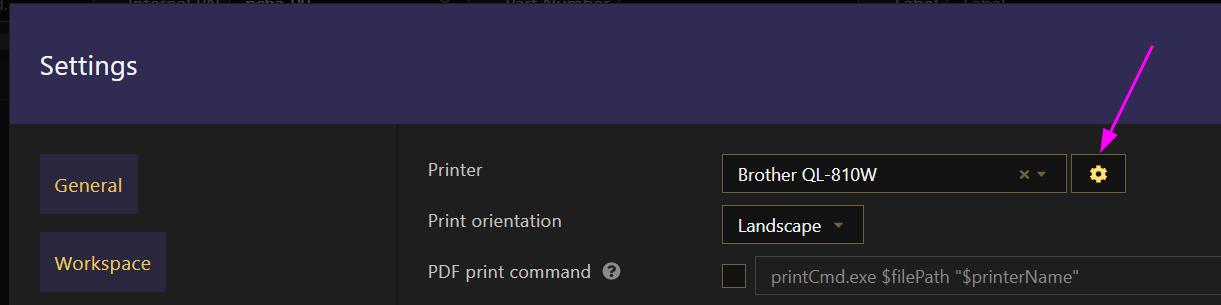
Before being able to print a label through the app, make sure you setup the printer for the right label size. Once you select a default label printer through the Settings - Barcodes dialog, click on the button right next to it to open the printer preferences dialog. If the printer is incorrectly configured (e.g. label dimensions mismatch) it might refuse to print.
Printing issues
Printing quality and the way you configure your printer highly depends on available drivers and their support for your operating system. This section gives you a few tips on how you can improve the quality of your prints and go around a few shortcomings.
Drivers support
On Windows and for Zebra printers, you can try these Seagull drivers.
On Linux and macOS drivers seem to be a bit lacking overall. For Brother QL-810Wc in particular, the name for appropriate label sizes uses codes instead of dimensions in a readable format (e.g. "DC01" should be selected for "17x54mm" labels). In these cases, you'll have to find out which code corresponds to the labels you want to use. Try contacting your printer's manufacturer for more information about that.
If, regardless of drivers, you can print labels with good results from the command line but not from the app you can also override the print command the app uses, as explained next.
Overriding the print command
This allows you to use any custom command to print labels. If you can print labels from your terminal, you can use that same command on the app by overriding the PDF print command and using wildcards ($printerName, $filePath, $data and $doc) that get replaced by their corresponding text. Look for the PDF print command in Settings > Barcodes.
Third-party PDF software
On Windows, the app ships with SumatraPDF which is used to print labels once exported into PDF format. Even though SumatraPDF has been working well for the most part, there have been also a few issues with it, namely poor printing quality and scaling issues on some printers or specific label sizes.
If that's your case, you can try to use other third-party PDF software such as Adobe Acrobat or Foxit Reader to print PDFs through the app. In order to do so, you'd set the PDF print command to something like this:
"C:\Program Files\Adobe\Acrobat DC\Acrobat\Acrobat.exe" /s /o /h /t $filePath "$printerName"
Each PDF software comes with its own shortcomings though. Adobe Acrobat will always open its GUI which might be inconvenient. Foxit Reader will happily run on the background but will add some margins to the labels. Each software also has its own way to configure printing settings (e.g. scaling etc). These settings might not be passed on the command line, so you'll have to use the app's GUI to print a label first so it remembers them whenever using the command line later on.
Command-line utilities (CLI)
On Windows, Sumatra PDF allows you to pass several printing options through the command line. This is what BOMIST uses under the hood but you might download your own version of Sumatra PDF (for free) and customize the way it's called by setting the PDF print command accordingly.
On Linux and macOS you might use lpoptions to configure your printer and lp to print labels. For Brother printers, you might also use the brother_ql command-line utility to print labels.
Some examples of usage:
$ lp -d $printerName $filePath
$ convert $filePath -scale 566x165\! /tmp/img.png && brother_ql -p file:///dev/usb/lp1 -m QL-700 print -l 17x54 -r 90 /tmp/img.png
Your own script
By using the wildcards $data or $doc you can write your own script that uses that information to generate your own barcodes or call another app to generate and/or print the labels. Note that both $data and $doc are replaced by base-58 encoded data. An example:
$ ./my-script-to-print-labels --printer $printerName --data $data
Dymo printers (Windows-only)
The app tries to fit a barcode label on whatever paper size is configured on your printer. However, Dymo printers seem to require the exact paper size to be passed whenever printing a PDF. For that reason, you might have to override the PDF print command so it includes the exact paper size you are using.
An example using Sumatra PDF (notice the paper option):
"C:\Program Files\SumatraPDF\SumatraPDF.exe" -print-to "$printerName" -print-settings "paper=11354 Multi-Purpose,landscape" -silent $filePath