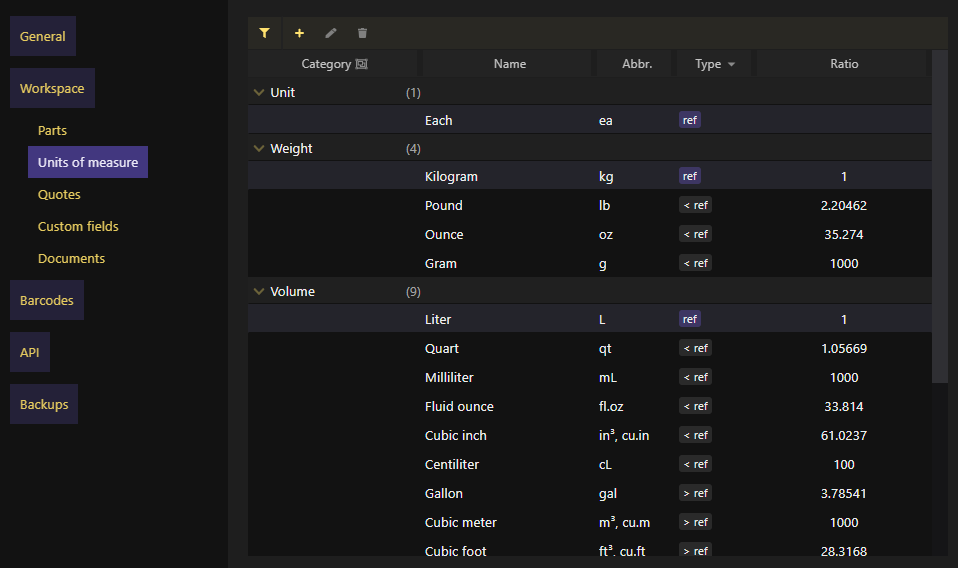
Units of measure: you can now track inventory measured by its length, area, volume or weight. New units can be created under these categories.
You can for example create different units for Unit (by default, Each is used) which would allow you to track quantities by Packs or 40-pin or pin which can then be converted to any other unit under the same category. Units of measure under the same category (i.e. unit, length, area, volume or weight) can be converted into each other.
With the introduction of units of measure, parts can also have different categories: electrical, mechanical and consumable. Only consumables can be tracked by its length, area, volume or weight.
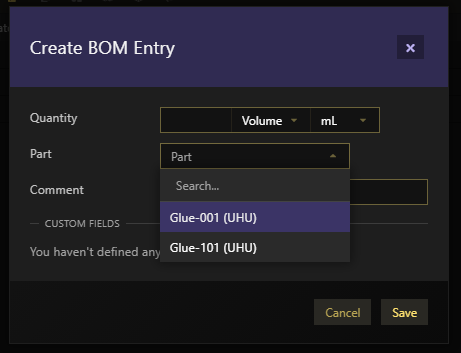
When manually creating a BOM entry, a part can be picked to be immediately assigned
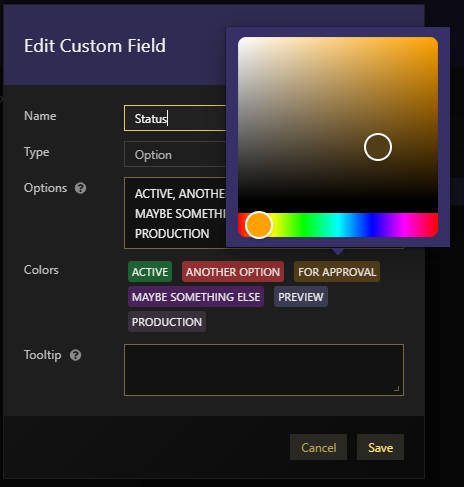
A color can now be defined for custom fields of type Option, which is displayed on tables
All fields named Quantity were renamed to Qty for brevity and consistency throughout the app
Number representation respects current locale
Workspace settings were re-organized and split into different topics for easier access
Production: links for project and project revision added to the top of the table
[fix] Project builds: chance for the `Pick alternate..." context-menu to be incorrectly disabled
[fix] Project builds: update allocated inventory when merging or splitting items
[fix] Generic parts: changed the way Stock Balance is calculated. Since generics don't keep their own stock (instead, they use stock from their alternate parts), Stock Balance for generic parts only takes into account their own planned and allocated inventory as open purchase lists and planned project builds are the only places where you can find generic parts listed. The Stock Balance of each of its alternates is then added into this value, but only if positive.
Project Pricing & Availability: when creating a purchase list, keep already selected quotes
Parts: generic parts now have an Inventory table on the Parts > Details tab, so you can see inventory of all of its alternate parts
Purchase Lists: when a generic part is replaced by one of its alternates, that part can then be reverted so it becomes the original generic part again
Purchasing: order multiples (i.e. an item that can be bought only on multiples of that value) are now used and if the quantity to be ordered is not a multiple a warning/error is displayed
Purchasing: quotes for generic parts include a reference to the Part Number they belong to
Projects: when removing a project revision you now need to type a confirmation text in order to make it harder to accidently remove its BOM and project builds
Projects: a project build is now considered in-progress once inventory has been reserved for at least one item
Parts: the on/off setting for the auto-completer for outsourced parts in the Part dialog is now remembered
Lots: when manually increasing quantity of inventory on a Lot a (big) warning is displayed and leaving a comment, briefly explaining this adjustment, is mandatory
Barcodes: angle brackets can now be used to replace non-readable characters on vendor-barcodes (e.g. <GS>; before only curly brackets were supported as in {GS})
Tables: when clicking on a chevron to expand/collapse a row, the corresponding row is not selected
[fix] When going-to Storage, chance for selected storage not to be visible if nested inside collapsed storage locations
[fix] When exporting tables into PDF or HTML, group by is now respected
[fix] Generic parts: stock (allocated, planned, etc) not being updated according to its alternates
[fix]Alt. Lot # can now be grouped by and sorting has been fixed
Inventory: inventory for in-house parts without a project associated to them can get a textual Rev (instead of having to pick a specific revision from a project)
Inventory: when adding inventory, a Rev can be defined
Lots: Lots can now be manually created through the Lots tab. These are named custom Lots as inventory can be added into them only manually (through the Inventory table or when importing parts)
Lots: Lot # can now be renamed
Lots: new field Alt. Lot #. While Lot # has to be unique, Alt. Lot # doesn't. It can be used to represent a vendor or customer-facing lot code, different than the one used internally.
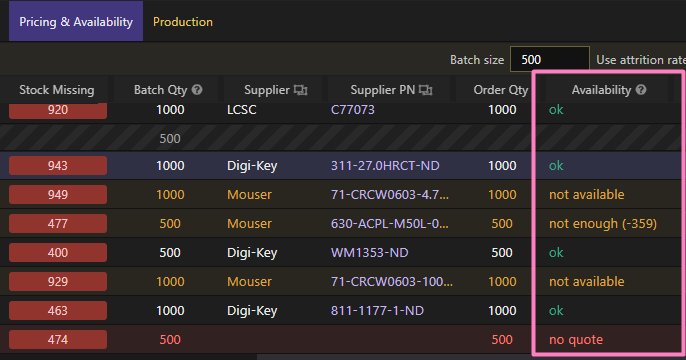
Projects: Pricing & Availability table now includes an Availability column. This represents availability to purchase (if needed), according to the selected quotes (or lack of them). This should make it easier to spot the parts that might be harder to source for the desired quantity.
Date pickers now have a select box to quickly select the year and month
Settings: Enforce quotes no longer exists. On a purchase list, selecting quotes is mandatory so purchase orders for each supplier can be created.
Multiple labels can be removed at the same time
Inventory on a Lot can now be manually increased. This might result in traceability loss as this adjustment might not be related with the purchase order or project build the Lot was originally created at, so adding a comment explaining this adjustment is recommended.
[fix] Suppliers: not able to create a price break on a custom quote
[fix] API: part not being correctly assigned when creating a project build
[fix] External links not opening on the default browser
[fix] Print shortcut printing inventory barcode labels on the Parts view, instead of part barcode labels
Team Workspaces can now be recycled. Recycling a team workspace consists of deleting it and creating a new one from scratch, keeping the same team members. All data is lost. Only owners can recycle a team workspace.
[fix] Parts: when manually creating parts disable auto-completer if type is not ´outsourced`